Earlier, I discussed how you can deploy a Django app on shared hosting. Deploying on shared hosting is a little bit difficult and tricky as compared to other options. But you can save some money by choosing shared hosting because in most cases, it is cheaper than other options. In this post, I am using the NameCheap shared hosting (Stellar Plus Plan) and Django version 2.1. I will be using a sample project to explain the serving of static files and media files in Django on a shared host.
Create the project
The project I am using here is also available on github. (You may choose to skip to the next part if you already have a project perfectly running locally.) It uses Django 2.1. Following are some points I want to mention about the code:
A django project is created and an app was created inside it.
A url is added in urls.py
from django.contrib import admin
from django.urls import path
from app import views

urlpatterns = [
    path('admin/', admin.site.urls),
    path("", views.index)
]
A view is added in views.py which returns a Django template.
from django.shortcuts import render

# Create your views here.
def index(request):
    return render(request, "app/index.html", )
The index.html is added at app/templates/app/index.html . It displays an image and loads a css file.
<!DOCTYPE html>
<html lang="en">
<head>
    <meta charset="UTF-8">
    <title>Sample Title</title>
</head>
<body>
{% load staticfiles %}
<link rel="stylesheet" type="text/css" href="{% static 'app/style.css' %}" />
<img src="{% static 'app/images/logo.png' %}" height="200px" width="200px">
</body>
</html>
The logo.png is present in the app/static/app/images directory along with another image file. The style.css file is present at app/static/app/style.css . It sets the other image as the background.
body{
    background: white url("images/background.jpg");
}
Make sure that django.contrib.staticfiles is added to INSTALLED_APPS in settings.py
INSTALLED_APPS = [
    'app.apps.AppConfig',
    'django.contrib.admin',
    'django.contrib.auth',
    'django.contrib.contenttypes',
    'django.contrib.sessions',
    'django.contrib.messages',
    'django.contrib.staticfiles',
]
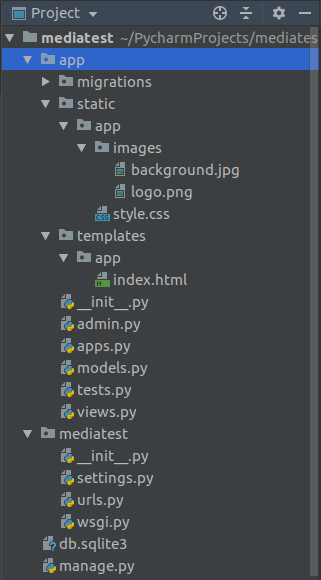
The directory structure can be seen in the screenshot below.

Setup the project on Hosting
I have written a complete guide about deploying Django app on shared hosting which you can read here. Follow that guide to create a python app in your cpanel and activate the virtual environment in terminal. The sample project I am using here is also available on github. I will be cloning the project from github to my destination folder in Cpanel. You may skip to the next section if you have already deployed your project.
After creating the python app and activating the virtual environment, make sure that you are in the folder where your app files are supposed to be (otherwise you can cd to that folder). Then run the following commands:
git clone https://github.com/UmerSoftwares/DjangoSharedHostingMedia
mv DjangoSharedHostingMedia/* .
The first command clones the files into a folder named DjangoSharedHostingMedia and the second command moves all the files out of that folder.
Edit your passenger_wsgi.py file and replace everything in it with the following code:
from mediatest.wsgi import application
Edit the mediatest/settings.py and add your domain to ALLOWED_HOSTS
Restart the python app.
Set up static and media files
In this part, you will be doing the settings for your static and media files. Edit your settings.py and add the following lines at the end:
STATIC_URL = '/static/'
STATIC_ROOT = '/home/username/public_html/static'
Replace username with your cpanel username. The STATIC_ROOT basically points to a folder named static inside your domain root directory. You will use public_html only if you are working on your main domain. If you are working on a subdomain, you will use the folder name instead of public_html as shown.
STATIC_URL = '/static/'
STATIC_ROOT = '/home/username/test.mydomain.com/static'
Now open the terminal in cpanel, activate the virtual environment and execute the following command:
python manage.py collectstatic
The static files should be copied to the target folder.

Go to setup python app in CPanel and restart the python app.

If you are using the sample project that I provided, you should see a webpage like this on your website:

I hope this post helped you. If you have any confusion in the process or you are facing any problem, comment below and I will add the answer in the FAQ section here.


Thanks for this good post I was able to serve statics and deployed my django website successfully.
Thanks
my django project is not working. when i save images getting page not found error
and when i remove imageField it saves data successfully.
please help me
thank you
Thanks a lot , I was getting trouble of this. Your post solved this.
Hi Thanks for your nice tutorials. Could you please write another tutorial on request.FILES on shared hosting, this request.FILES is working on local host but not working after deployment.
Thnaks
If the problem is during uploading the files, see this stackoverflow for fix
https://stackoverflow.com/questions/63328969/cannot-upload-media-files-on-cpanel-using-django
Already find a solution, thanks for your reply though. Do you have any writing about the best option for Django deployment? you have mentioned that shared hosting is not the best options for django.
What was your solution please
WHat about media files, uploaded files arent showing
Why media files are not working after debug=false
and also static files??
This has been the most helpful post in deploying my django app.
Thanks a lot!
I specially thank for you. I did my first django project hosting with this tutorial
this is the best place for deploying Django application I saw so many videos but until I follow this document is I did not get solution tanks a lot🙏🙏🙏
Thanks a lot , Thanks for this good post I was able to serve statics and deployed my django website successfully.